Blog

|
updates include: vector plane for controlling gain of 4 oscillators, Low pass filter added, Reverb left and right, additive synthesis option (32 partials), Preset creator, Requires less processing power.  before we continue and look inside, lets consider the harmonic step calculator on the right. the purpose of this tool is to send pitch information to the additional 3 oscillators. each number reprisents a partial and can send the coarse and fine tuning (in standard tuning) to whichever oscillator you want (a, b or c). The buttons have been coloured in relation to the interval from the fundamental. black is the fundamental, grey are the octaves, blue are the fifths/fourths, green are M3/m6, yellow is m7/M2, red is A4/D5, pink is M7/m2, light blue is M6/m3. Now lets take a closer look inside 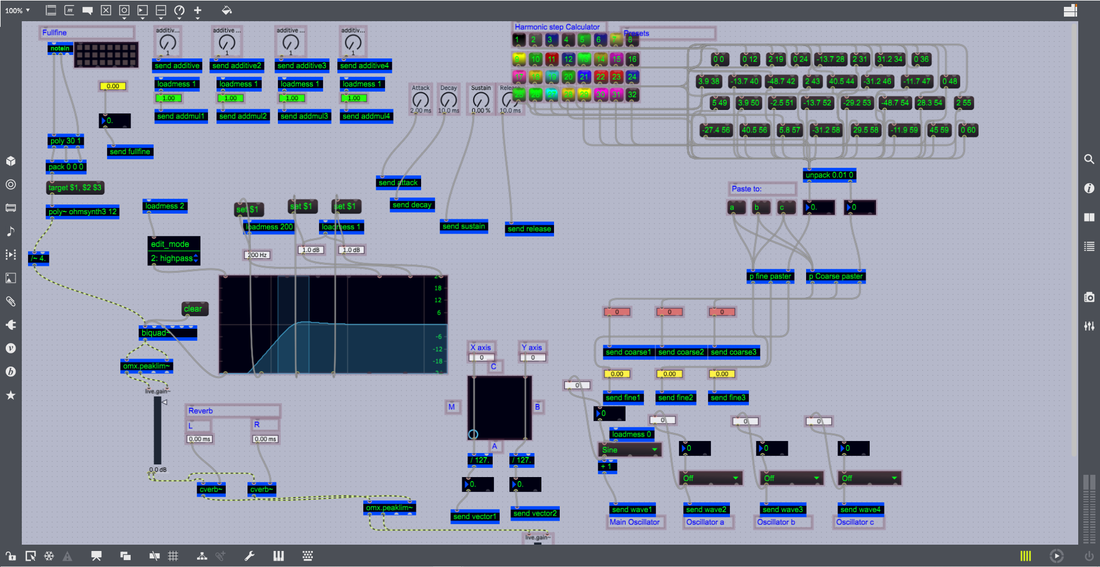 Above you can see the control panel for the Ohmsynth. these objects send information deeper into the patch and displays the controls in a nice neat configuration. at the top we have our controls for the additive synth, the adsr evelope controls, and a harmonic partial calculator which can send information to each additional oscilator. in the middle we have our low pass filter, a vector control, and then some number boxes which control the fine and coarse tuning for the additional oscillators. just undernath that we have our wave selection tools which offer us a selection of sine wave, triangle, rectangle, sawtooth, random, and an additive option. finally at the bottom left we have a reverb control for left and right. lets go a step deeper and see whats insode the poly object. 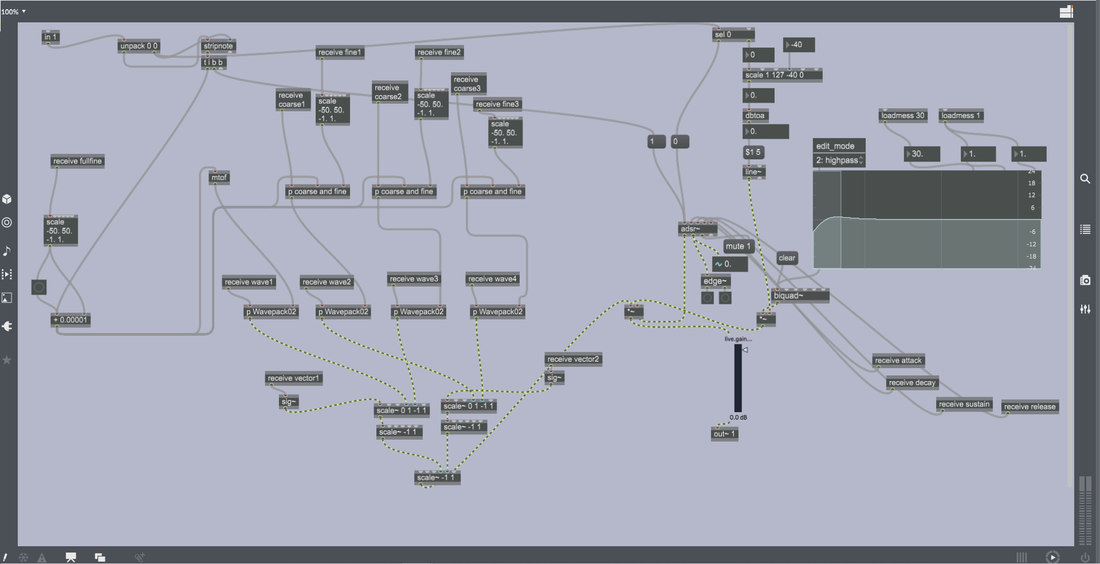 our firts level of this poly synth deals with pitch information, adsr and gain control. on the left side there is a "full fine" adjustment which alters the pitch of everything by a certain amount of cents. on the right hand side we have our adsr objects and a low pass filter to remove any frequencies we cant hear in the low frequencies. the purpose of this is to eliminate loudness in places we cant perceive it and boost frequncies that we can hear. the middle section controls the fine and coarse adjustments for the additional oscillators and selects what wave form they produce. (see below for encapsulated parts) 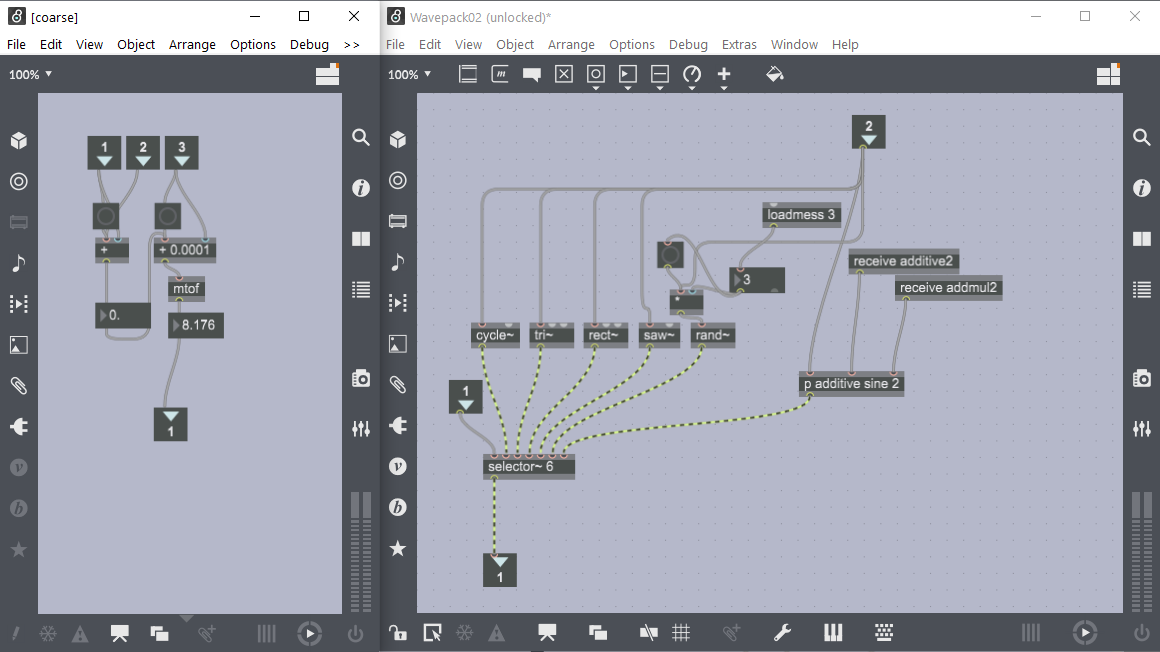 next we're going to go into the "additive sine 2" encapsulation 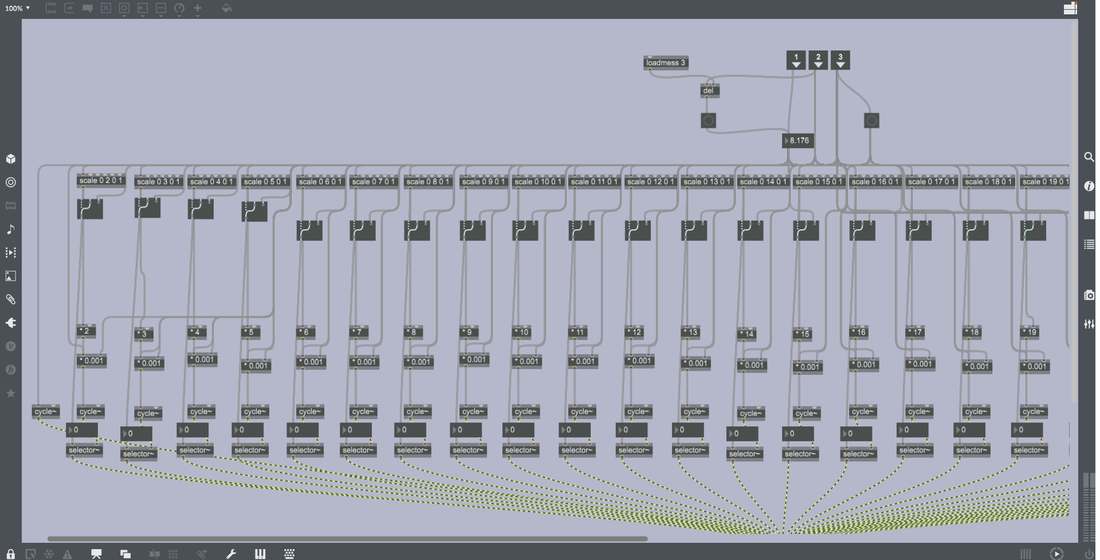 these channels only turn on when the additive dial is turned up. you can see two seperate functions which can alter how each partials frequency is calculated, first a set variable (x2, x3, x4 etc.) then a second which can be altered by the partial ratio control. the reason why I've done it like this is because if you leave the switches open then the patch is constantly calculating numbers to send to the additive synthesiser, which increases the load on the computer. if you do it this way, the entire thing is isolated and doesnt work as hard until you turn it on. thats pretty much it!
0 Comments
 9/10
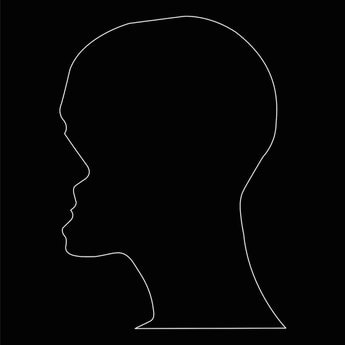
New York based artist Nicolas Jaar blesses his audience with another masterpiece of an electronic concept album. The Album explores styles influenced by improvised jazz and avant-garde and combines them with his contemporary dance electronic style, the result is a fully immersive 3-dimensional stereo experience that takes the listener on a journey through the meditative emotions that the artist is feeling through the isolated and scary times of 2020. The music flows seamlessly from one song to the next, and is nicely peppered with little glitches and time changes that keeps the drone and one tone nature of the album interesting. The sudden endings and seamless changes also help to capture the attention of the listener and adds to the rich and lush sounding atmospheres that Jaar creates. The album itself is a cry to a higher power, to save the world from its current state of isolation and loneliness. This is evident by the gloomy and meditative atmospheres that the listener is confronted with, along with the chanted lyrics “savior come down” early in the album (Vanish) and later by the lyrics “hello, chain” in the song (Hello, chain), which suggests that the artist is ready surrender to that higher power in exchange for some kind of release from his prison of isolation during these crazy times, or perhaps that this loneliness and isolation is the chain itself, that he greets like an old friend by now, accepting himself as a slave to his humanity and the emotions that come with it. The album is not without moments of beauty however, the harmonies that Jaar uses manages the difficult feat of being rich and warm, at the same time as being dark and lonely in its nature. He achieves this by removing all other instrumentation during sections, and by stripping it back so that its bare in moments leaves the music very vulnerable and longing. Listening to the album from start to finish, it seems to get brighter and warmer with the more experimental and improvised sounding songs like Agosto, Gocce, Vaciar, and rubble, which is especially interesting to me because often those styles are much more difficult to listen to. In this rare occasion, these songs seem to glue the entire album together while bringing a feeling of warmth, curiosity and wonder to the listener. The combination of all these emotions; dark, gloomy, meditative, curious, beautiful, warm, could it be that Nicolas Jaar is attempting to warmly embrace his audience as he forces them to experience a selfreflective meditation? The album art (a head with the face turned inward) seems to support the idea that he wants his audience to look inward. In the eyes of Nicolas Jaar, perhaps the world is in desperate need of saving. This album serves to create change in the world through the individual by creating an atmosphere where they can come to terms with their humanity and look inwards. Jaar knows that the solution to the issues that we face as people is often found within our own being, and rather than confronting those issues aggressively, his taken a passive stance and invited his audience on a journey of self -discovery in hopes that we will all find a better way to coexist. An absolutely wonderful album and work of art! -Daniel Ohm 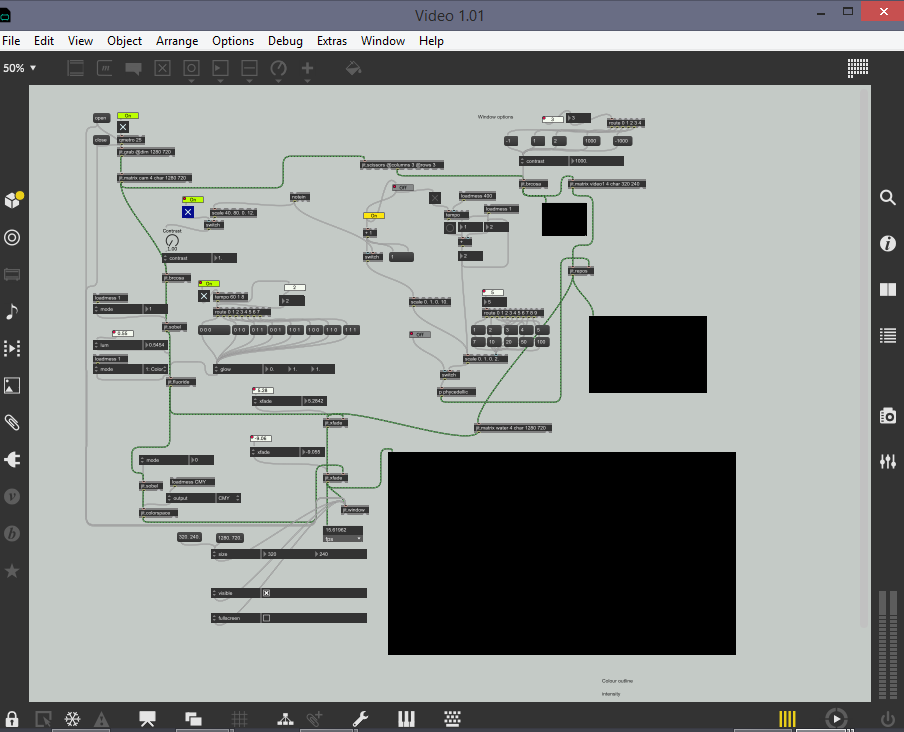 To be honest, there wasnt as much creativity in this patch as my Poly instrument that I'm super proud of. With that said: This is a Video Effects tool that uses mutiple different forms of modulation. One form is by taking midi note information from ableton; in the example below, you can see a fast flickering occuring. This is the contrast being controlled by midinotes in ableton. It corresponds to music that is also being played but in this example you cant hear the music. it also uses a tempo tool so that on every beat the outline changes colour. There is a bit more to it then just that, But i dont want to go into too much detail talking about this patch, partly because most of the stuff within this patch was just stuff that we covered in class. To create this it kinda felt like playing with instgram filters, so to me it didnt feel like i created something original. It still was really fun to put this together, and i think the skills i learned here are going to be used again for projections to accompany my music in the future. In the pictures above you can see a Poly synthesiser that i created in Max MSP. At this stage in its production it has four oscilators, with an adjustable waveform, the three additional oscillators could be switched off, has a course tuning number (red) in semitones and a fine tuning number (yellow) in cents and also has a dial that controls the gain of the individual oscilator. The main issues that i faced with this version of the poly synth was getting the adsr~ object to function correctly. Its important to note that the attack and decay take a whole numer in miliseconds, the sustain takes a decimal from 0 to 1, and the release takes a whole number again in milliseconds. the attack controls how quickly the note reaches full volume after pressing a note. shortening the time for this will make the note reach its peak very abruptly, and lengthening it will allow it to smoothly move to its peak. Decay functions in a similar way, but in reverse and travels down to a percentage of the volume which is set by the sustain. The realease should indicate the time that it take for the sound to move from the sustain value back to nothing again. The issues that i had was getting this tool to function correctly in a poly instrument. I noticed, after applying the adsr~ object that it was only playing notes for a few instances within my poly (like only 3 times out of 12 or something stupid) and i had to dig around to find where the problem was for quite some time. I realized that for some reason, when the bang came through the first time in these instances, it was sending a 1 message, and the second time it was sending a 0 message. I was initially trying to use a toggle tool to activate the envelope and this was part of the problem. i believe the edge~ object was sending a message back up to the toggle and creating a message feedback loop within the circuit. To fix the problem, i created 2 message boxes, one with a 1, one with a 0, and made a delayed bang that was also being modified by the release time. This fixed the problem once and for all and my poly instrument was up and running! In the picture above i had decided to move on to max for live to continue my patch creation. I noticed that most max objects can't be automated from ableton without an ableton object connected to it. so you can see I've added a few nice ableton numberboxes for that purpose. I also got rid of the kslider because i was now getting note information from the midi in ableton live using the notein object.
One of the issues taht i faced was in automating the adsr functions. Within the created live sliders (which all had modified ranges) automating them in ableton ended up overloading my CPU. i think it had something to do with the amount of steps that i was allowing inside these objects. ableton was creating a smooth line, and max was trying to calculate the decimals of that straight line and it was all too much. to fix the problem i made sure that i had 1 extra step then the whole number of the range of the slider (if the range was 250, i needed 251 steps). Problem solved. I wanted to expand a little more on the idea, and i thought it would be really cool if i had a "harmonic calculator" that would automatically calculate a partial from whatever note was being played in the midi. So I created a whole bunch of message boxes with the correct distance from the fundamental (in semitones and cents) linked them all up, and created a subbing in process that allowed me to select an oscilator to send the information to. (i also coloured the presentation message boxes in regards to how they relate to their intervals - octaves are black, fifths/fourths are dark/light blue etc). I found experimenting on this tool really fun and interesting. I've had a fascination with the harmonic series for quite some time, so having the ability to manipulate the timbre of a sound is something that i think I'd like to explore further. 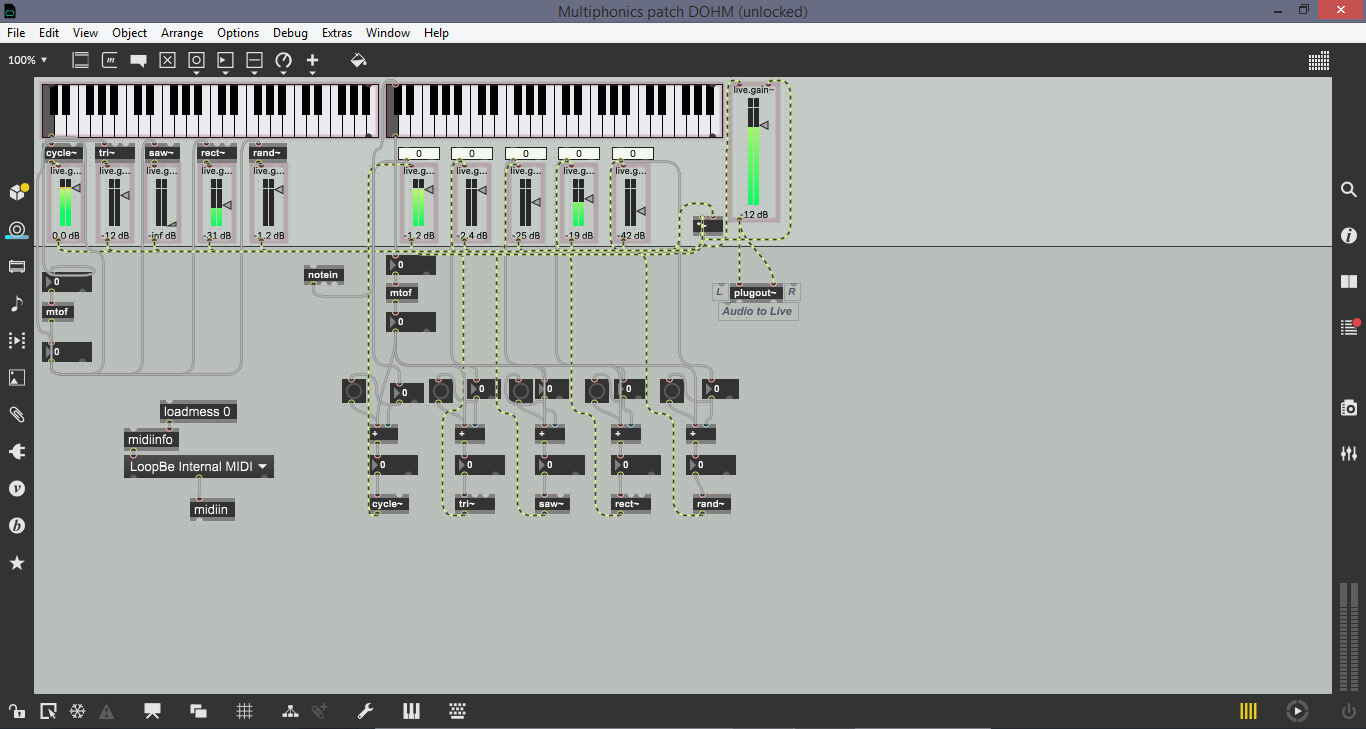
Max MSP is a program which allows for the ultimate freedom in creating new sounds and using technology to alter events in audio and video in real time. One of our classes as second year students (Interactive performance lab) teaches us how to create a signal chain between objects for the purpose of creating new sounds and adapt it to other forms of media. Some of the functions that i find extremely interesting right now is the creation of virtual instruments by manipulating a generated waveform and also mainpulating a video feed with a sound source. above you can see a picture of a synth that i created. There are five different waveforms that feed into a multiplication object from two seperate synths. Each waveform has a fader that can be adjusted to change the timbre of the sound. on the second synth there is an additional tool above each waveform which allows for fine tuning each waveform seperately. the result is an adaptive ring modulation control tool that can be used to create dark atmospheric drones and also be fully automated in ableton. My next max patch will likely be one that alters a video feed that is being manipulated by a sound source, hopefully to create some psycedellic imagery to accompany my electronic music. I used this synth in my peice "no safe place" the link is just below
Over the past few months I've had the opportunity to make use of a makers space in osborne park as their resident artist. The artifactory have a range of tools at the disposal of those who are capible of using them. For me it was a chance to reconnect with my trade abilities and i was able to manufacture my very own instrument design; The Chimeaphone.
The concept was rather simple, a frame that holds a series of tuned pieces of galvonised steel pipe. Prior to this build i was fascinated by making wind chimes and i decided that i was going to build an entire instrument in standard tuning using the same method. After making several sets of wind chimes i was ready to tackle a larger concept, so i got to work! Here is the end product from the build along with a taste of my performance at NM!!  Phonetics can be used to create really interesting vocal music pieces.
There is an example below https://youtu.be/HQGbj5bJIJ0
The late great composer, Shoenberg, had decided he wanted to take his music in a different direction. Shoenberg was alive during the romantic era in music, and was something of a forefather into the world of Post Modern serial music.
The idea that Schoenberg had was to alleviate harmony and tonality and create a new way to make interesting music. At the time, he had believed it would secure the supremacy of German music for the next century. His idea was to use each of the 12 semitones in a scale the same amount during a piece, to destroy any reference to a tonal centre. The result of this idea was the 12 tone series, and while it may not be the easiest thing to listen to, it certainly has its place in the world of music. It can have this really creepy feeling to it, which is a quality that every good modern composer should be able to emulate. How does it work? Each of the 12 notes must be played in sequence before a note is repeated. A good way of doing this is creating a 12 tone row, and augmenting in certain ways Retrograde: playing the same sequence in reverse order. Inversion: playing the same sequence with the intervals swapped from ascending to descending. retrograde inversion: Both 
Here is my tone matrix.
Now from here i can select either a row or a column to play in a sequence in the music. I might select rows that compliment one another, i might have a certain code hidden in the music using the numbers or letters. For my piece i selected numbers that correspond with my birth date: 10/08/1992 You can view the score just below
If you've read any of my previous articles, you could see that my interest is very much peaked when the topic of note frequency comes up. I've been absolutely obsessed with it!
So, lets talk about tuning systems. We know that our harmonic series works in a linear trend (as a pose to just intonation which follows an exponential trend). I noticed one other pattern in the harmonic series, and that's how many notes per octave there were at different stages of the series. first there is one note per octave, then 2, then 4, then 8, then 16, then 32. It made me wonder why we choose to have 12 notes per octave in our standard tuning when 12 doesn't naturally occur in our series. Based on this realization i decided to create a tuning system with 16 notes per octave instead of 12, and i wanted to experiment with it a little bit! I actually had the idea for a little while, but i just lacked the insight on how i could achieve it, because building a midi instrument that has more then 12 tones is actually quite challenging. questions like How does it relate to a midi keyboard?, how do i get a synth to play in this tuning when most synths are built around the 12 tone chromatic scale? I delved into the internet in search for methods, but came up pretty dry. I tried a few programs but only got errors with the programs (god damn it scala). But then, as if from above, the idea came to me! Why don't you just record sine waves at the right frequencies into a drum rack? (i felt like a bit of an idiot for not realizing it sooner) It took a while to record the frequencies and sub them into a drum rack, but i compiled about two octaves (around 32 notes) based on the 16 tone scale that related to A being 440Hz. y=2^(x/16)*440 as i was recording i realized sine waves were too basic and didn't really sound that great! To add a little bit of flavour i put a "harmonic adder" on the sine tones. Once i had my scale, it was time to experiment with it to see how the notes related to one another. I realized that just like in our normal scale, there were certain notes that were dissonant and certain notes that were consonant. based on that, i built two scales, one major and one minor. I started writing little melodies that kinda sounded like fair music with a haunting nature. Eventually i used this scale in my "Line" assignment for uni, which was and assignment where we had to write a single melody with no accompaniment, no chords, and using compositional techniques! To hear the track with the tuning system in it, you can find it in the experimental section of my main page. The song is called Wash Away Marketplace. (because it sounds a bit like it could be played in a marketplace as background noise. Yesterday i submitted my Workshop Sounds piece.
In my class at WAAPA, we were required to complete a project on "sound objects." The assignment was not aloud to have a distinct rhythm, melody or musical direction. Quite a strange premise to me and most of my classmates. I really had to allow myself the space to think outside the box, and then the idea came to me. Only months earlier i assisted a friend of mine with a project on his film course. I helped with doing sound on the set of a short film. There i learned about atmospheric sound and the purpose for capturing it, and some of the problems that come up when recording sound for a film. One of the issues was unwanted sounds making it into the recording, and how difficult it can be to remove those sounds. My idea for workshop sounds was to create an environmental atmospheric sound, without any accidents or unwanted sounds making it into the mix. To achieve this i recreated a handful of recorded sounds on synths. the first step was to record the sounds in my old workshop at WA Industrial Chrome Engineers. I called my old supervisor and organised a day to go visit and collect a bunch of sounds. When i arrived everyone was really helpful with what i was doing. everyone remained as quiet as they could as i was recording and respected the process without me even needing to ask. I did my thang, recorded the sounds, thanked my boss and took off to make a start at recreating the sounds. Now that i had a good collection of sounds, it was time to analyse them. I started by putting an EQ on the recorded tracks to work out roughly what pitches and harmonics were sounding off. Once I had that, I subbed those pitches into an empty MIDI track and cycled through plugins until I had a sound that closely resembled the recorded sound. when i had a collection of 10 different ideas, i arranged them to tell a short typical story that would naturally occur within the workshop. Clements machine would pretty much work non stop, the air compressor would cycle through three different phases, and then random sounds occur like a hammer or a forklift reversing and taking off. Then when a large barrel drops it worries clement, he turns off his machine to check it out for a moment, then when he see's its all good, he restarts the machine and keeps working. |
AuthorMy name is Daniel Ohm and this section will include my research into music theory, experimental ideas, Mixing techniques and lessons learned from creative forums and musical endeavors. Archives
September 2022
Categories |
||
 RSS Feed
